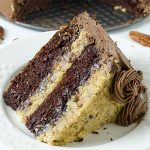
Craving a decadent dessert? Try this easy Nocilla lava cake recipe.
There are few things in the culinary world more satisfying than cutting into a warm cake and watching a river of chocolate flow out. It’s the kind of dessert that stops conversation at a dinner party. Everyone just stares, mesmerized by the molten center. While restaurant versions often seem like magic tricks reserved for professional pastry chefs, the truth is much sweeter: you can make this at home in under 30 minutes.
Today, we aren’t just making a standard chocolate fondant. We are elevating the classic with a secret weapon that adds a nutty, creamy depth you can’t get from chocolate bars alone. This Nocilla lava cake recipe uses the beloved Spanish cocoa and hazelnut spread to create a dessert that is rich, comforting, and surprisingly simple to whip up.
Most chocolate lava cakes rely heavily on melting expensive baking chocolate with butter. While delicious, this method can sometimes be temperamental. If you overheat the chocolate, it seizes. If you don’t use high-enough quality chocolate, the flavor falls flat.
Using Nocilla solves these problems effortlessly. Because Nocilla is already a stabilized emulsion of cocoa, milk, and hazelnuts, it provides a consistent texture that melts beautifully. The hazelnuts add an aromatic dimension that pairs perfectly with the dark cocoa notes. It’s a shortcut that doesn’t taste like one; in fact, it tastes better.
When you bake with this cocoa and hazelnut spread, you get a center that stays liquid longer than pure chocolate ganache. This means you have a wider window of “doneness,” making this recipe much more forgiving for home bakers.
Ingredients You’ll Need
What makes this recipe particularly appealing is its straightforward approach. Most of the required ingredients are common staples found in the kitchen.
- Nocilla Original (or Nocilla Noir for a darker taste): 1 cup. This is the heart of the dish.
- Unsalted Butter: 4 tablespoons, melted and slightly cooled.
- Eggs: Use 2 large eggs and 2 additional yolks for extra richness and a silky cake texture.
- 2 large whole eggs plus 2 egg yolks. The extra yolks provide the richness necessary for that velvety texture.
- Granulated Sugar: ¼ cup. You don’t need too much since the spread is already sweet.
- All-Purpose Flour: 4 tablespoons. Just enough to hold the structure together without making it cakey.
- Vanilla Extract: 1 teaspoon.
- Salt: A pinch to balance the sweetness.
- Cocoa Powder & Butter: For greasing the ramekins.
Step-by-Step Instructions
Follow these steps closely, especially the timing. The difference between a lava cake and a brownie is about two minutes in the oven.
1. Prep Your Ramekins
Preheat your oven to 400°F (200°C). Generously butter four 6-ounce ramekins. Dust the inside with cocoa powder (flour leaves white streaks, which doesn’t look as nice). Shake out the excess. This step ensures your cakes slide out easily onto the plate.
2. Mix the Wet Ingredients
In a large bowl, whisk together the eggs, extra yolks, and sugar by hand or with a mixer until the mixture turns light in color and thickens—a process that should take about 3 to 4 minutes. Finally, blend in the vanilla extract.
3. Incorporate the Star Ingredient
In a separate heat-proof bowl, combine the Nocilla cocoa and hazelnut spread with the melted butter. If the Nocilla is too stiff, you can microwave it for 10-15 seconds to loosen it up. Whisk until smooth and glossy.
4. Combine the Batters
Carefully fold the chocolate mixture into the beaten eggs, using gentle, sweeping motions with a spatula to keep as much air in the batter as possible—this helps create a light and fluffy cake.
5. Add Dry Ingredients
Sift the flour and salt over the batter. Fold gently just until the flour disappears. Do not overmix, or the cake will be tough rather than tender.
6. Bake
Spoon the batter evenly into each of the four prepared ramekins. Arrange them on a baking sheet for easy handling, then bake for 12 to 14 minutes.
Crucial Tip: The edges should look firm and baked, but the center should still jiggle slightly when you shake the pan. If it doesn’t jiggle, the lava has turned into rock!
7. Serve
Allow the cakes to rest in their ramekins for about a minute. Gently run a knife around the edges to help release the cakes, then invert a dessert plate over each ramekin, flip them together, and carefully lift off the ramekin to unveil your dessert.
Serving Suggestions
A warm Nocilla lava cake is a powerhouse of flavor, but the right toppings can take it to the next level. The contrast between hot cake and cold toppings creates a delightful sensory experience.
- Classic: Add a scoop of rich vanilla bean ice cream on top. As it slowly melts over the warm cake, it creates a luscious sauce that complements the molten center.
- Fruity: Fresh raspberries or strawberries cut through the richness of the cocoa and hazelnut spread. The tartness balances the intense chocolate flavor.
- Crunchy: Sprinkle crushed toasted hazelnuts on top to reinforce the nutty profile of the Nocilla.
- Elegant: A simple dusting of powdered sugar and a sprig of fresh mint makes it look like it came from a 5-star kitchen.
Conclusion
Baking doesn’t have to be complicated to be impressive. This Nocilla lava cake recipe proves that with the right ingredients, you can create a luxurious dessert that feels special enough for an anniversary but easy enough for a Tuesday night craving.
The secret is simply trusting the rich, creamy texture of your cocoa and hazelnut spread to do the heavy lifting. So, grab a jar of Nocilla, preheat that oven, and get ready to impress your friends, family, or just yourself. After all, you deserve a little molten chocolate magic


Leave a Reply