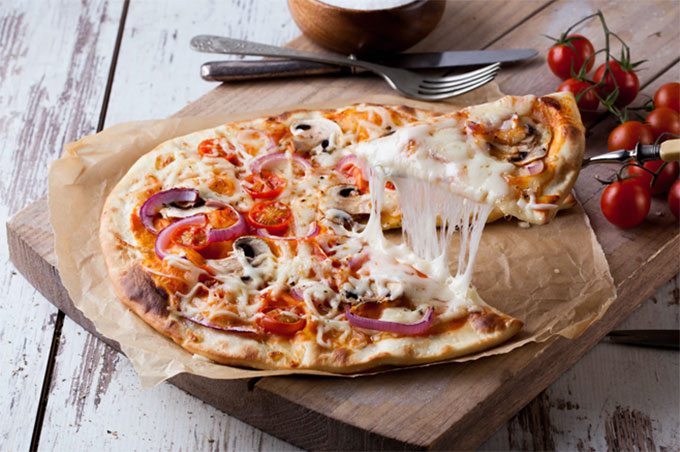
Pizza is a truly unique dish: it is rather easy to cook and very tasty. Moreover, there are hundreds of recipes, so you can make a delicious pizza with almost any ingredients you have. No wonder that so many people are eager to make it at home. In this article, we are going to share a simple recipe of making and forming pizza dough and give some crucial tips not to ruin the pizza.
Step 1: Preparation
We won’t be going into details about the specific brands and models of the equipment you will need as there are lots of corresponding guides and articles on pizzaovenradar.com. Below is a shortlist of what you will need to prepare a pizza at home.
Equipment:
- A glass bowl;
- A measuring spoon;
- 2x measuring cups;
- A rolling pin;
- An oven or a pizza stone.
Ingredients:
- 1 cup of warm water;
- 1 TBS of olive oil;
- 2 cups of all-purpose flour;
- 1 tsp of salt;
- 1 TBS of active dry yeast;
- 1 TBS of sugar;
Step 2: Activate the Yeast
The second step is to activate or proof the yeast. It can be done by mixing the water, sugar and yeast in a bowl and letting it rest for around five minutes. The most important thing here is to keep the water warm but not hot, it should be around 100-110 degrees F. If the yeast does not become foamy in five minutes, something went wrong and you will most likely need to start over.
Checking the expiration date of the yeast is a must. You can also use a thermometer if you are not sure about the temperature.
Step 3: Mix and Knead
The next thing to do after the yeast is activated is to mix the dough. You just have to add your olive oil, flour and salt to the bowl. Then mix it properly until it becomes a sticky ball of dough. After that, just lay it on a floured surface and knead until it loses its stickiness.
The process usually takes no longer than five minutes, so it is not really effective to use a mixer. Washing it will take more time than just kneading the dough with your hands. Moreover, you will feel your dough better and reach the perfect condition easily. It is also necessary to have some additional flour in case the dough is not reaching a good consistency.
After the kneading is done, you can either let it rest for about half an hour until it doubles in size or start rolling it right away. The resting part is not necessary, but most professionals prefer to perform it as it leads to a softer consistency.
Step 4: Roll and Form
As soon as the dough is ready, you can start rolling it. As it is a homemade pizza, you can make any form you want: rectangular, round or any other. But before making the fun shapes, take into account that you will have to cut it later, which might be really uncomfortable with odd forms. The most comfortable form for serving at home is rectangular as it is the easiest to cut.
There is not much special about rolling: the only trick is that it should be done on a floured surface. Rolling should be done until the dough is about ½” thick. You can make it thicker or thinner, but it will affect the baking time. The last thing here is to flip the edges to make the crust.
Step 5: Baking
Despite the article being about the pizza dough, which is ready at this point, we have decided to include some baking tips as well. First of all, once the dough is rolled, you should start baking it as soon as possible not to let it rise again.
There is also a common problem when the cheese and the toppings are ready, while the dough is half raw. In this case you will either have to burn the toppings or eat the unprepared dough. An easy solution is to pre-bake the dough a bit, which is especially necessary for thick pizzas. To perfectly match the timings, you need to pre-bake it until it is slightly set.
Another trick is to bake the pizza on the lower rack of the oven. In this case, the dough receives more heat than the toppings do and the pizza becomes more balanced. In case you are cooking on a pizza stone, you will be fine, as all the heat comes from the bottom.
Once the toppings are added, you will need to bake the pizza for around 15-20 minutes. It is important to check the pizza as regularly as possible as it only takes a few minutes to be burnt after it’s ready.
Some Extra Tips
There are also several tips I would like to share about cooking pizza at home. It is very common that someone wants to make pizza at home, does something wrong ruining the whole dish and loses his or her desire to try again. Therefore, these tips won’t improve the taste or add a spice to your dish – they will just help you not to ruin the first batches.
First of all, the sauce is no less important than the dough. You can either select a good one in your local store or create one at home. There are lots of quick recipes for sauces online, and you will have enough time to make it while the dough is resting.
Another important thing is to make sure the oven is preheated well. If you get your dough in a cold oven, you will ruin the whole pizza and have to restart the whole process. Make sure the oven is about 550 degrees F before you put your dough inside.
The dough itself may be stored in the refrigerator, which means you can pre-make it before getting through the rest of the recipe. If you do so, make sure the dough is warm when you put it in the oven. Cold dough will ruin the whole pizza.
The sauce layer should be pretty thin in most cases. Otherwise, the structure of your dough will be ruined while baking, and you will taste nothing but the sauce.
The last advice we have is to put a thin layer of cheese between the sauce and the toppings. It will make the ingredients flow on the surface instead of sticking to the dough. It is not really necessary, but definitely worth trying, as the pizza becomes much easier to eat.
Try and Improve
The best thing about making pizza at home is that you can customize it and develop your own recipe through experimenting with ingredients and cooking. We hope that your first pizzas with this recipe and these tips will be good enough for you to want more. Don’t forget to share your opinions in the comment box. Or maybe you have your own tips and tricks for making the best pizza at home? Feel free to share them as well.


Leave a Reply